WordPress themes are something that all WordPress powered websites need. And at some point in time, we need to revamp the website to improve its appearance and performance. There are various kinds of WP themes that we have formed a collection of in our blogs. Every website owner should look at those themes to see if any of them fit their website and its requirements. But, there is also a concept called a WordPress Child theme. A child theme is a WordPress theme that takes template files and features from another theme. Here, the theme from which the features are taken is called a parent theme. There are many benefits to using a child theme, but the most important one is that when the core functionality of your parent theme is updated, your customizations in a child theme stay in place.
Let us dive a little deeper and understand the meaning and importance of the child theme. Moreover, we are also going to take a look at the tips and tricks when it comes to designing child themes in WordPress.
1. Defining the WordPress Child Theme:
So you must be wondering about the meaning of the WordPress Child theme. A child theme is one that borrows or picks up the templates and files from another theme. Thus, the child theme takes up functionalities and features from the parent theme. Hence, the theme that picks up the features from another theme is called the child theme. And the one that provides the files and features to the child theme is called the parent theme.
The folder of the WordPress child theme can include a CSS file. And, parent themes tend to get updates after every little interval of time. But, you can customize the code of the theme to turn it into something that your website needs. In such a scenario, if you update the theme, you lose all the customizations. You can choose to ignore the updates, but that would mean that the security would be less.
A child theme is said to work in a way similar to the parent theme. This happens because we mentioned that the child theme takes up the features from the parent theme. The theme still behaves like the parent theme without copying the files from the parent theme to the child theme. The secret lies in the style.css file of the parent theme. To create a child theme, you have to build a folder in the WordPress themes main directory. Name the folder accordingly. And put the following line of code in the style.css file in the child theme’s folder:
/*
Theme Name: The name of the child theme (e.g., The WordPress Child Theme)
Theme URI: http://www. Child Theme Example .com (Your child theme’s URL)
Description: A short outline of the child theme
Author: Here goes the name of the developer of the child theme
Template: Directory name of the Parent theme(e.g., Parent-Theme, Main-theme, etc.)
Version: 1.0.0
*/
Now, edit the sixth line in the code given above and place the following code:
Template: Name of the Parent theme directory
This lets the WordPress child theme know which one is its parent theme. And that is the theme from where the child theme can take up the functions and features. Once this is done, the child theme gets the features and files from the specified parent theme. And the child theme is successfully installed on your platform. In short, the template line decides the inheritance of the parent theme when the child theme is triggered.
2. Benefits of activating a Child Theme on your website:

As we have already established that the parent theme offers some or more of its features and functionalities in the child theme. This enables you to update the parent theme whenever the upgrade is available. In such a situation, you can use the features of the parent theme in the child theme. Hence, as the parent theme gets an upgrade, you can safely update the parent theme. And it does not disturb the child theme at all in the process.
The flexibility that comes with a child theme is innumerable. It lets you build new templates that don’t come from the parent theme. Moreover, it is also possible to add new features and extended functionalities. For this purpose, you can access commercially and freely available tools.
While using the child themes, the best thing about them is, it is easy to deal with the problems that show up when the line of code is missed out. WordPress is quick to provide a solution to that kind of issue using the parent theme. But this is possible if the line of code exists in the parent theme too.
3. Creating a WordPress Child Theme:
As daunting as it looks, the process of building a Child theme is effortless and straightforward. You can access the child theme builder for an empty child theme, use a plugin, or create your child theme. Let us take a look at each in a detailed manner.
1. Using a Child theme builder:
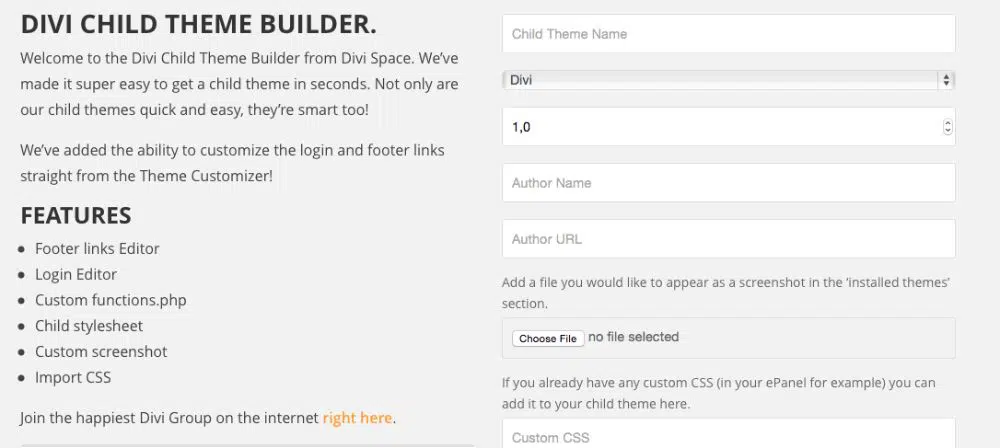
Divi Space provides a great tool with which you can use the child theme builder to build one. You can use the tool for free. In this tool, you have to enter all the details in the provided text box, and everything is downloaded. As it is done, all you have to do is upload the zip folder to the WordPress console. This should be done once the installation and activation of the theme are accomplished.
2. Creating a child theme using a plugin:

To make the process even simpler, you can take up a plugin to support the process of building a child theme. Once you download and install the relevant plugin, the Child theme builder shows up in the menu item. This all happens within the settings menu of the WordPress console. As you reach this point, give a new title to the generated child theme along with the description. Now click “Create Child.” As you do this, an empty theme is generated.
3. Building your child theme:

If you are interested in seeing what goes into building a child theme from scratch, then you should take up this step. It is a good idea to take this step up if you want to gain some wisdom on how to build a child theme from scratch.
This process needs an Integrated Development Environment (IDE) working on your system. And then you have to create and save some relevant files. But Brackets and Sublime are the editors that you can use for free. They also come with color codes to make everything easier. Moreover, you can also use TextEdit on the MAC system or TextEditor on PC. In either of the tools, you have to be careful when it comes to writing and editing the lines of code. One mistake and the entire code can go down the drain. So you have to follow the following two steps:
- Build a theme directory in the website’s directory.
- Generate a style.css with the child theme’s details and information in it.
- Take a screenshot.
If you have been working with a local host server, you have to go to the right folder in your website’s directory. Here, you can find a folder that consists of all the files. But if you are dealing with a live server, configure all the folders and files and take up an FTP client once everything is done. Under the themes folder, build a new folder and give it a title that is relevant to the client. For instance, you can name it “child-theme” at the end of the folder’s title.
1. Create a theme directory:
Create a folder in the directory of the theme for the child theme that you want to build. Add a name to it. Let us, for instance, name it DiviChild.
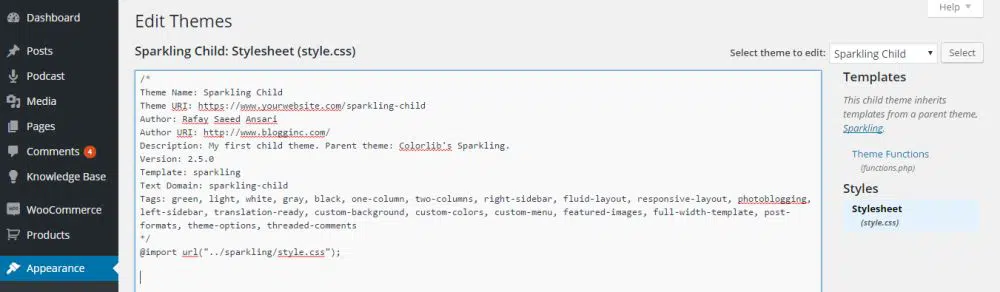
2. Style.css:
Now, create a stylesheet file for the theme named “style.css.” Put the following code in the IDE. Rename the file as per your requirements.
/*
Theme Name: Divi Child Theme
Theme URI: https://MyWebsite.com
Description: Child theme, according to Divi
Author: Name of the author of the theme
Author URI: https://iamauthor.com // Your web address
Template: Divi
*/
Make sure that you change the details where your information has to be fed. But the essential things in the code are the “Theme Name” and “templates” section. The text specified in the “Theme Name” is displayed in the appearance>Themes of the WordPress theme list. The “Template” defines the name of the parent theme from which the feature set should be taken.
3. Functions.php:
Start with functions.php file and open the IDE. Take up the first block of PHP code or use the code given below:
<?php
Add_action(‘wp_enqueue_scripts’, ‘enqueue_parent_styles’);
Function enqueue_parent_styles()
{
Wp_enqueue_styles(‘parent_style’, get_template_directory_uri().’/style.css’);
}
?>
Put this code in a new file and ensure that all the file paths and directories are mentioned correctly. These directory paths of parent and child folders should be given correctly. Save the file as functions.php in the child theme’s directory.
4. Ways to Install the WordPress Child Theme:
As the WordPress child theme has been successfully built, now it is time to install it and use it on your website. The process remains the same whether you work on a local server or a live one.
To install it, take all the files into a folder and compress the folder to create a zip file. Make sure that a WordPress instance is installed and functional on your system. Install the Divi.zip file using Themes>Add New section of your WordPress Dashboard. As you are done installing, click Activate. Now, Divi runs as a parent theme here.
Now, go back to Themes>Add New section of your WordPress Dashboard. Choose the zip file of the child theme that you built. As you are done with the installation, it can be activated to get it running.
5. Customizing the Child Theme:
The purpose of building a child theme is to customize an already existing theme. Hence, let us take a look at how you can customize the WordPress child theme.
a. Applying customizations in the child theme:
As we created the first file that was style.css, we should start changing the code in that file. Adding a custom code in this file, you can override the parent theme’s behavior and feature set. Using the CSS file, all kinds of modifications can be made to the child theme. With this file, you can change all the styling in the resulting child theme.
To do this, you have to add a custom code at the bottom of the CSS file of the WordPress child theme.
Conclusion:
Using ready-made WordPress themes is one thing and creating a customized theme out of an already existing theme is another. Moreover, all the themes that are available online are ready to install. But if you want a customized theme, you don’t have many options to get them ready-made. For that, you have to write down the line of codes to make sure that the theme you want is customized. Hence, in the WordPress jargon, the customized theme is called a child theme. The reason behind this is that the child theme comes out of a ready-made theme. And the child theme picks up the feature set of the parent theme or the ready-made theme. Thus, the child theme does not pick up the upgrades when the parent themes are rolled out. And this makes sure that the customizations are not lost. This blog helps you understand the usage, creation, and benefits of using the child theme.
