
For the creative folks, whose work life is predominated by major creative software of Adobe suite, knowing all the tools and using them in their designs can be of paramount importance to optimize workflow, time management and deliver quality designs. Adobe Illustrator is one of the most widely used designing tools which every designer would have worked on and mastering this tool is quite important.
While there is an array of tools available in Illustrator, width tool in Adobe Illustrator is one such hidden gem, which majority of design artists use in their tasks regularly. To make things quick, Shift + W gets handy as a short key for Width Tool. Do remember that as this will help in getting your edits done quickly.
Besides knowing the basic functions of the tool, there are many advanced uses for it and right ways of using the Width tool. Here’s the checklist to go through for maximizing the use of width tool in Adobe Illustrator:
1. Align Stroke to Center
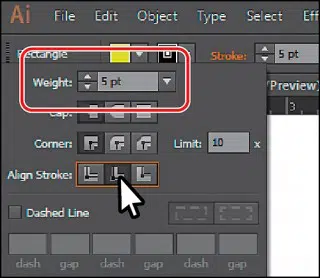
One of the foremost step while making Paths which you are going to enhance further using Width Tool, is to make sure that the Stroke is aligned to the “Center”. The feature is disabled when the stroke is aligned to “Inside” or “Outside”. For this, go over the Control Panel. Just beside ‘Fill Color’, click the underlined word ‘Stroke’ and you will find three options in Align Stroke. For aligning the stroke in the center, click the first option and you are good to go. This gets avoided by default when the path is open. This way you will find that the Width Tool is enabled now if it wasn’t working before in case the stroke was aligned other than centrally. The primary reason for this is to optimize the functionality of the tool. All the features designed for Width Tool can give best results when the stroke is centrally aligned. This helps a great deal with the main function of the Width Tool i.e. symmetry. The standard stroke can be converted into any desired shape using Width Tool.
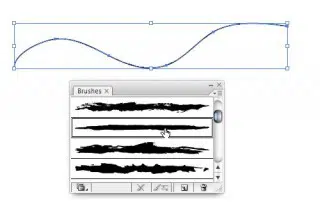
2. Convert Brush Definition to “Basic”

While using the Brush tool in Illustrator, make sure to convert the Brush Definition to “Basic”. When you first “draw the path”, select the “Basic” option in Brush Panel (F5). The Basic option in Brush Panel isn’t even a brush but rather means to remove brush strokes for the selected paths and convert it to just a standard path. This will finally enable the Width Tool. When you already click the Basic and then draw, the default calligraphy brush gets applied to your path, which is devoid of any variant effects. The idea is, you don’t need Brush tool when you have Width Tool and vice versa, which brings us to our next checkpoint.
3. Problem with Brush Tool
When one knows the hows and whys of Width tool, it becomes apparent that the Brush tool and Width Tool, can’t work together. Width Tool is basically used to apply one own’s effect to the basic path, which might be a shape or even a text converted into a shape. Since it’s meant for creating variants in paths, it doesn’t work in Brush and gets disabled. Fair enough! No wonder why it’s widely used in custom hand lettering!
4. Using ‘Live Paint’
In some cases, the option for converting the strokes to basic might not be available. This might happen when there are a lot of paths selected to convert and might just allow you to change the width profile. It might also happen that the option to convert to basic is available but selecting it won’t make any difference. In either case, you can always go to Object> Live Paint > Expand, which will enable the Width Tool.
5. Use Pen Tool or Shape Tool
When working with Width Tool, it’s always wiser to opt for either Pen tool or a Shape tool to make Path from the start. This is a simple way to avoid unnecessary barriers and have better control over your design. It’ll give you a better workflow and show proficiency in your work ethic. Directly using Pen tool for your design, will enable you to control the number of stroke points in the path. Since only you know which area of the Path you want to apply scale and weight too, you’ll be able to keep points to the minimum number. This will ensure that your path looks fluid and is devoid of bumps. Width tool is a winning tool for those who prefer freehand drawing and use Pen tool for a major part of their artworks.
6. Working with Pen Tablet
If you’re a frequent Pen Tablet user, you’ll realize that the Width Tool is specifically designed for “tablet” workflow. It gives a similar experience to that of working with pencil and eraser to fine-tune the thickness/weight of your path. It’s always convenient to use a simple stroke path or a pencil if you have already decided to use Width Tool. For heavier transformations in width, one should rather use Transform Tool to handle the stroke points. If you prefer to hide the “Width handle”, while using the Width Tool, use Alt + 5 as a short key. Same is to be used to make it visible again.
Referring to this checklist just a couple of times while using Width Tool will help you get a better handle at the tool and bring a drastic efficiency in your designs. Illustrator can be very effectively used for making Icons, Cartoons, Mascots, Patterns, and even website wireframes and mockups. So open your Illustrator and get back to learning more tricks of the width tool in Adobe Illustrator.
