
As designers, we often add links to documents and websites, but adding hyperlinks in Photoshop is not as easy. Therefore, we’re going to look at the step-by-step process of how to add a hyperlink in Photoshop.
With Adobe Photoshop, changing backgrounds, simulation of a real-life poster, or creating a parallel universe view is made possible. It’s also possible to add a hyperlink (also known as a URL) to an image directly in Photoshop.
There are pros and cons of Photoshop, as with any application, but in this tutorial, we will just focus on the often-desired feature of hyperlinking an image directly within the program. Let’s get started!
1. Using the Slice tool:
Slice tool is a tool in Adobe Photoshop that enables a user to create a batch of images from a straightforward or a layered image. With this tool, you select an area on the image that you want to preserve for further users. The remaining space can be exported to a new Photoshop document.
With the creation of multiple slices of one image, you can save each slice as an individual document. To use this tool, you have to keep the image as an HTML file instead of a JPEG file format. A layperson can also use this feature as it does not require any kind of knowledge in coding. Photoshop generates the syntax of HTML needed and embeds the picture in a web-friendly format for the image.
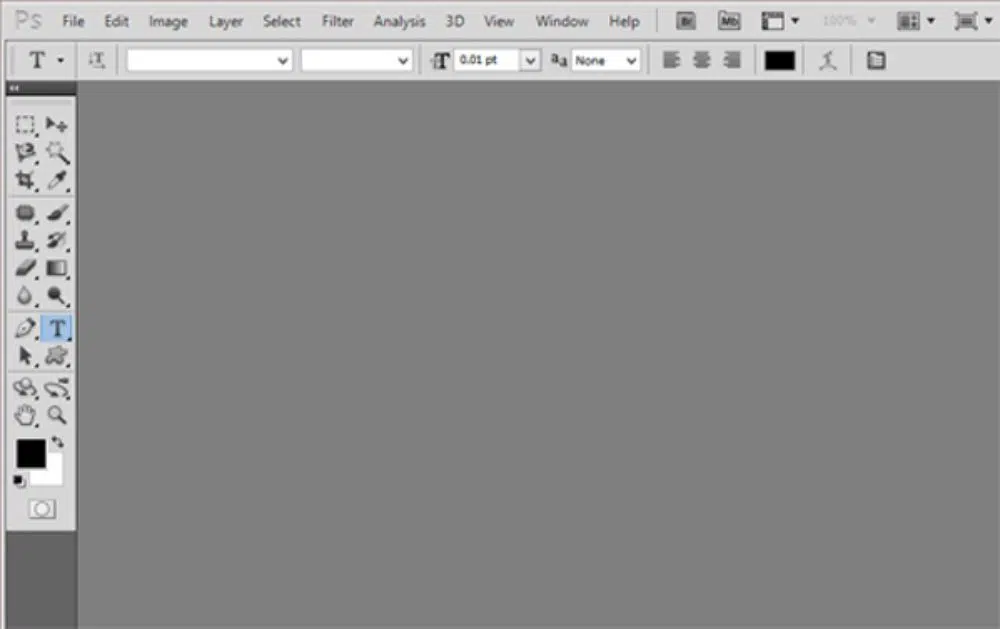
Open an image in Photoshop. Ideally, you should use a large painting for this purpose. Select the “Slice tool” from the Photoshop toolbox. If the tool is invisible, click and hold the right bottom corner of the Crop tool or other tools in the group. Once you see the Slice tool, select it by clicking on it.
There are things that you need to consider before working with a Slice Tool. You can create slices of an individual image using a Slice tool or the layers of the picture. The selection of slices is made using the Slice Selection tool. You can move, resize or realign the slice with other slices.
Moreover, it is possible to specify the name for each slice, type of the slice, and the URL. Optimization methods of each slide are available in the settings of the “Save for Web” dialog box.
2. Slicing the image:
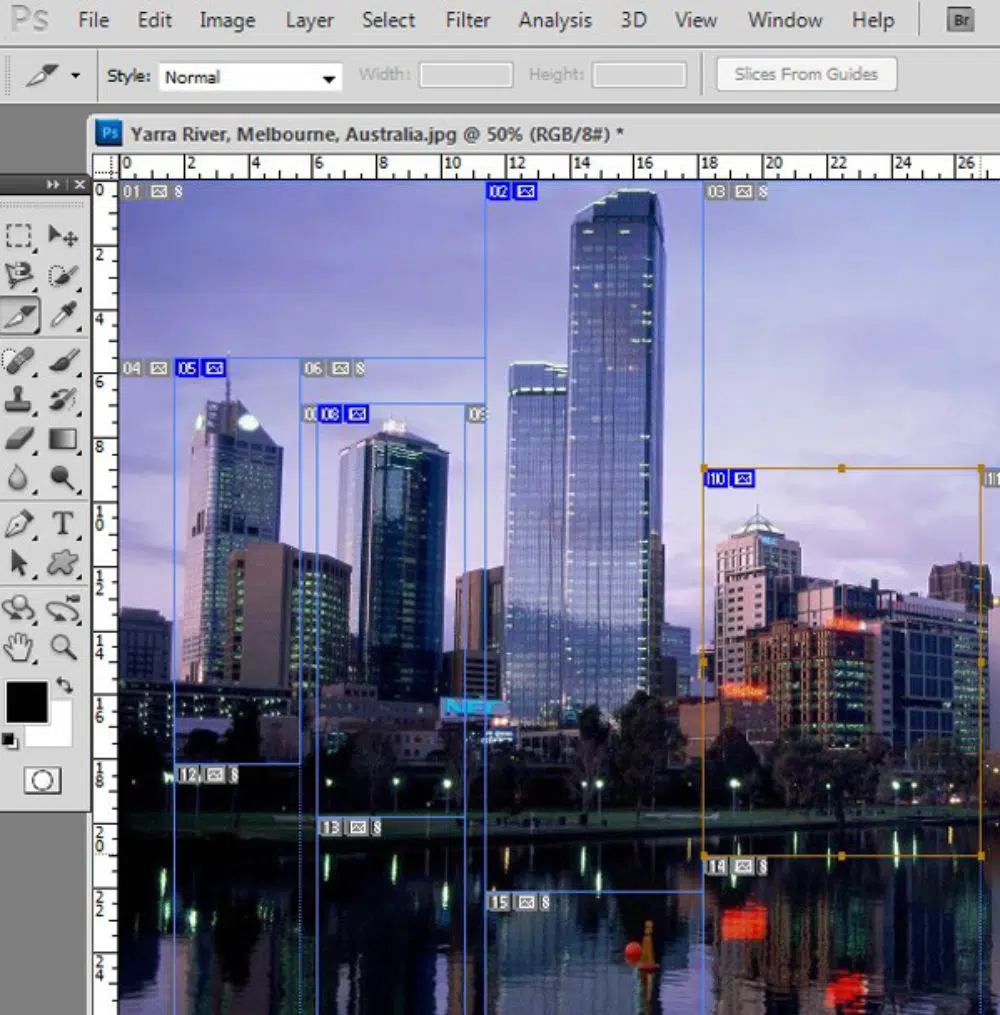
Drag the mouse cursor around the image of real estate that you want to be turned into a hyperlink. For creating one hyperlink on an image, you have to drag the cursor over the entire picture. You can select multiple areas on the same image that can have different hyperlinks. Here, we are going to select various areas where we will place a hyperlink.
The Benefit of Image Slicing
Image slicing is beneficial for the use of images on the web as it allows the Internet to load individual parts of the image, one piece at a time. It is especially useful for designers and web developers that work with very high-resolution images.
With a slow Internet connection, such large files take a lot of time to render or sometimes don’t even open clearly. You can create slices with three attributes: Normal, Fixed Aspect Ratio, and Fixed size. Normal is the slice size where the slice is the area you mark as one slice.
The Fixed aspect ratio is where the size of the slice is in the whole number system. For instance, you can specify the height as 20 units while width as 10 units, for a slice. The Fixed sized slice has the height and width specified in terms of pixels.
You can compress the image, but it will only make the image’s quality suffer, to a certain extent. Therefore, slicing is the solution to rendering large pictures on the web. It is also beneficial for users that have slow internet connections.
Slicing, as we previously saw, allows you to let the image render piece by piece, one piece at a time. The slicing tool cuts the high-resolution pictures into pieces, and each piece saves as a separate file. This method optimizes the usage of the file over the Internet.
Photoshop is a smart tool that creates HTML or CSS to display the sliced image. When it loads in a web page, each section or “slice” of the image is rendered and reassembled in the browser to generate a smooth-looking image.
3. Mark the area for hyperlink placement:
Once you have selected the image and marked the areas where you have to put the hyperlinks, run the cursor only on one part of the image if you want multiple hyperlinks. As you complete it, release the mouse button. You have created one slice of the picture. Now, you can select another slice of the image by dragging the mouse on the other part of the image. It is possible to create more than ten slices of one image and place hyperlinks on all the pictures’ slices.
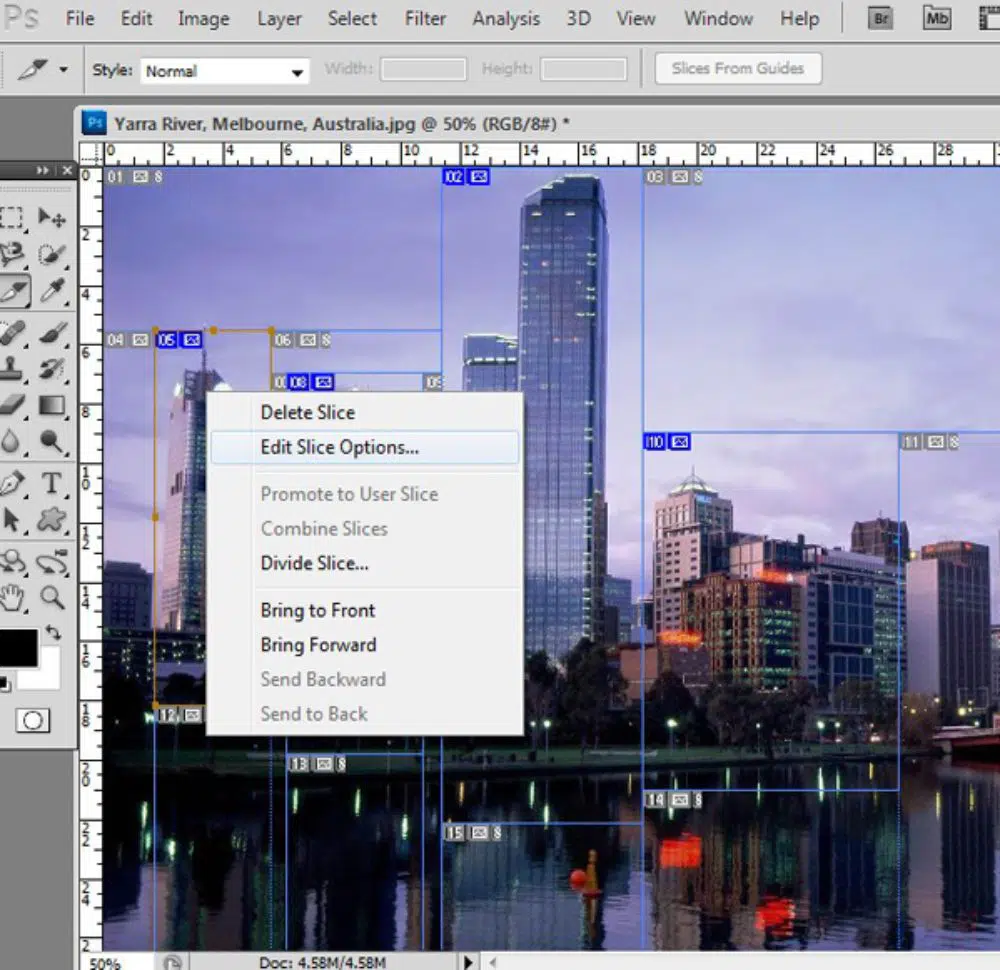
You can name a slice by its purpose, as you make a slice out of an image. Usually, user slices names are based on the settings in the Output Settings dialog box. You have to select a slice, and double-click it with the Slice selection tool to display the Slice Option dialog box. Type a new name in the Slice Option Dialog box.
4. Link Placement:
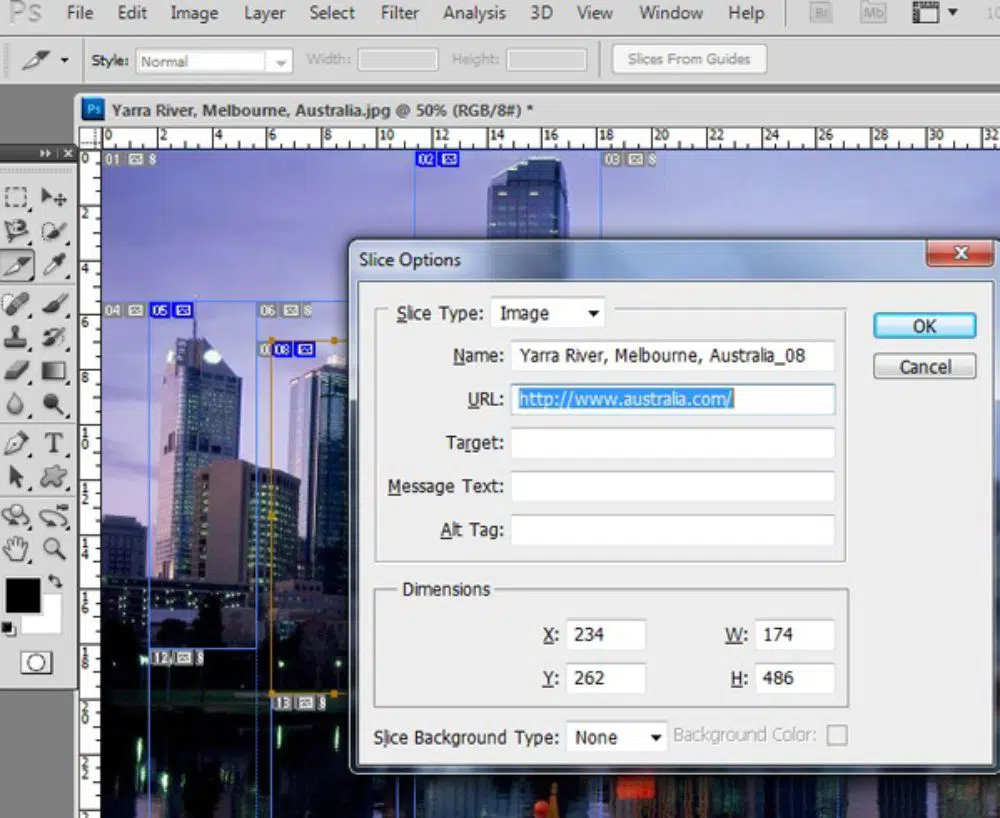
Once we have marked the area and formed the slices of the image, it is now time to assign the links to the individual slices. To do this, you have to double-click a selected slice with Slice Tool to open the Slice Options window. In the URL field, you have to specify the website address or the URL of the webpage you want to link. You can use the name of the link to distinguish it from the other links. It is okay to enter a relative URL or an absolute URL. If you are using a relative URL, you have to make sure you use the proper URL protocol.
In the target text box, you have to enter four different values, depending upon the purpose of your link placement. “_blank” meaning when you click the link, it will open the linked page into a new browser window. “_self” means that the clicked link will open the linked page in the same browser window. “_parent” leads to displaying the related content in the original parent frameset window. You should use this option if your HTML document makes use of frames.
Hence, the linked content appears in the current parental frame of the page. “_top” opens the related content in the entire browser window after removing the frames in use. Here, the link name must match the name of the frame specified in the HTML document file. When a user clicks the link, the related content appears in the same frame name as the link’s name. Hence, the names of the link and the frame should match.
5. Save for web and devices:
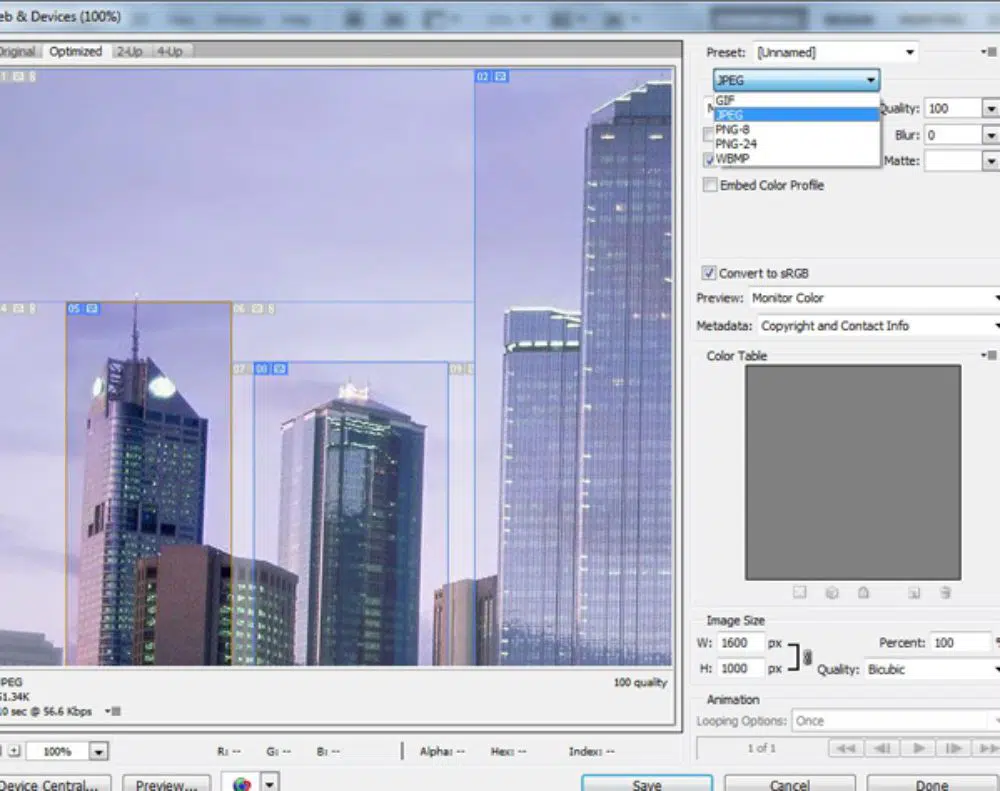
Once all the parameters have been specified in the Slice Option window, it is time to move further. As you complete the linking of the slices with the relevant content, go to the File menu, and select “Save for Web.” You can choose “PNG-24” or “JPG” as the Preset and then click the Save button to save it. Now, go to the “Format” menu and select “HTML and Images.” It converts your current file format to an HTML file format.
Once you click Save, Photoshop creates an HTML page using the image and the links you have placed. You have to save the image in the Images folder. Use it on the Internet, and upload the HTML file and the Images folder to the same folder on your website using your FTP (File Transfer Protocol).
More On Saving Files
While saving the file, you can specify the file type and the nature of the compression for each slice. If you do not want to change the settings, you can save the files with default settings. As you click the save button, it opens up “Saved Optimized As” dialog box that asks for several essential settings.
- Format- You get three options to save the file. They are HTML and images, Images only, and HTML only.
- Settings- You get Custom, Background Image, Default Settings, XHTML, and Other as your options.
- Slices- You have to select one of these: All slices, All user slices, and Selected slices.
You can also specify browser messages that appear in the browser along with the alternate text. Image slices only have these options available and appear in the exported HTML files. Double-click the slice using the Slice Selection tool, you want to write messages for. It opens up the Slice Options dialog box. Type the desired text in the Slice Options dialog box.
Message text- The default message in the browser’s status for a selected slice or slices, is changed. Usually, here, the URL of the slice is displayed.
Alt Tag/Alt- It specifies the Alt tag’s values for one or more of the selected slices. The text in the Alt Tag appears in browsers that do not support graphics. It also appears as a tooltip in some browsers. Alt-text is the text that is visible in the place of the image when the image is downloaded.
Frequently Asked Questions
What is Photoshop?
Adobe Photoshop is one of the most powerful software applications for editing images, graphics, and videos, and is available for use on Windows, and macOS computer systems or via Creative Cloud. It enables the user to create, enhance, or modify images, videos, artwork, and illustrations.
Photoshop is available in different versions like Photoshop CC, Photoshop Elements, and Adobe Lightroom, and is an essential tool for graphic designers, web designers, artists, and photographers.
What is a hyperlink?
A hyperlink is a web address also known as a URL (Uniform Resource Locator). These are basically all the links that you click on throughout the web that direct you to websites, web pages, and documents. Most people refer to them as “links”.
What are slices in Photoshop?
Web designers often need to link the parts of the images called slices, to the relevant information on the web. There are various requirements for connecting the content with the images and texts on numerous platforms like Adobe Illustrator and Adobe Photoshop.
The Slice tool enables a web developer or a graphic designer to create various pictures from a single image.
The same thing is possible with a layered Photoshop file. It is useful, especially if you are building a web page with a predominant image linking content to different websites. Therefore, this blog can guide individuals looking to link pictures or images and use them on the web.
Also, when sliced up, the images can be rendered beautifully on the Internet, despite being very high-quality images. The reason behind this is, the images are sliced up and are saved separately as individual files. And therefore, the quality of the image is preserved along with the decreased load time on the web browser, even if the Internet connection is slow.
Conclusion
In this blog, we have covered the simplest way to add hyperlinks in Adobe Photoshop on any image. It is a comprehensive guide to how the parts of a single image can link to multiple contents on different parts of the web.

I saved my file. I need my hyperlink open with a popup. Is there any option for that?
i saved my file and i need the same as image to send mail is there any option for that
I am desperately trying to figure out how you create a hyperlink in a jpeg-picture. It needs to be a jpeg-file, not html, since it is a picture that is to be automatically included in Outlook (as a banner at the bottom). Is this possible?
I’m trying to figure this out too… Has anyone replied to you?