Many times, when you need to attend or conduct a zoom conference you need to find a good spot with a nice background. However, it is not always possible to do so. Zoom lets the users create customized zoom backgrounds so they can have a decent looking background wherever they are.
We have all used Zoom for video and audio conferencing, audio and video chats and webinars across mobile, laptops and platforms that involve tablets. Zoom brings the employees together and helps businesses and organizations to get more work done from their employees.
If you have conducted video conferencing with your teammates, or with your managerial employees, you must have found the setting in the zoom to customize your background. These backgrounds are generally used to prevent the visibility of the room you are sitting at. It gets difficult to have a video call when you have a messy room in your background. That is precisely where the virtual zoom background comes in.
Zoom’s virtual background allows you to use and display an image or video as your backdrop during a video call, a conference or a webinar that you may have conducted.
In this blog, we see how we can create a custom zoom background in Photoshop and how we can use the custom zoom background while conducting video conferences. Let us see the steps to accomplish the task at hand.
Creating a Custom Zoom Background
To create a new background that you can use in Zoom while having a video conferencing, you need to have the latest version of Adobe Photoshop. However, if you already have the new version of Adobe Photoshop, make sure that you have it updated according to the latest rollout of the software, installed.
The background is an essential image element. You can have a background that is either plain or has a variety of intricate designs. Hence while designing a background for Zoom, you have two options. You can create a background from scratch, or you can use an image and customize it in Photoshop according to your requirements.
Let us take a look at both the options.
- Creating a new background from scratch.
- Creating a background from an already existing image.
Method-1: Creating a new background from scratch:
Here, we see how to create a new background from a blank document step by step.
1. Opening Photoshop software:
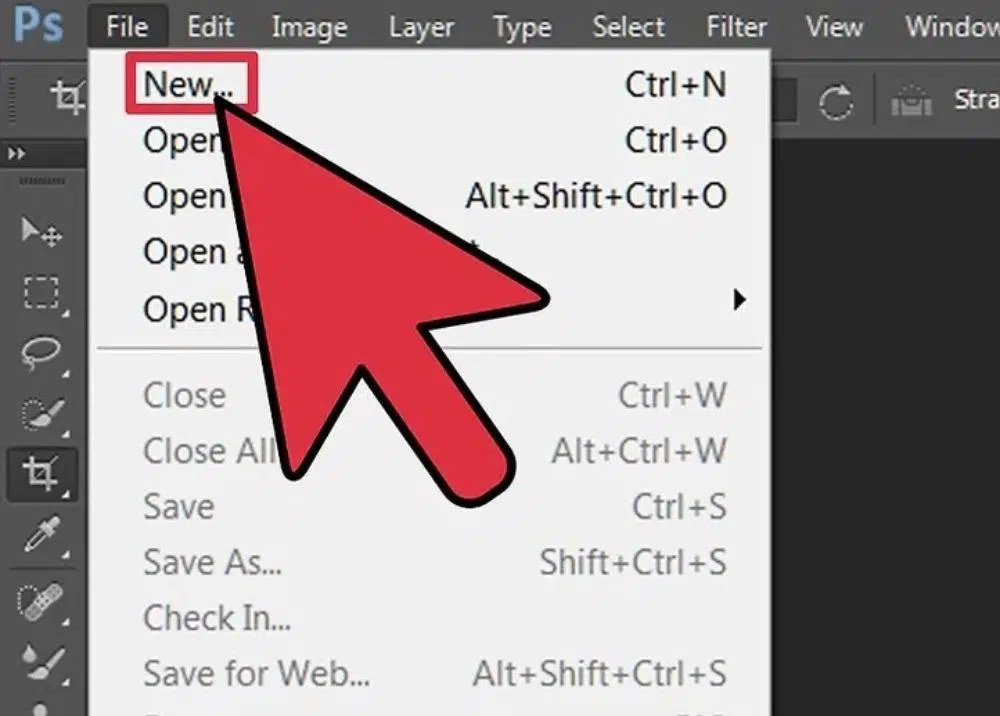
Once you know that you have an updated copy of Adobe Photoshop, you can open the software by double-clicking it. Once the software opens, you have to create a new document by clicking the “New” option in the File menu.
2. Document Settings and Configurations:
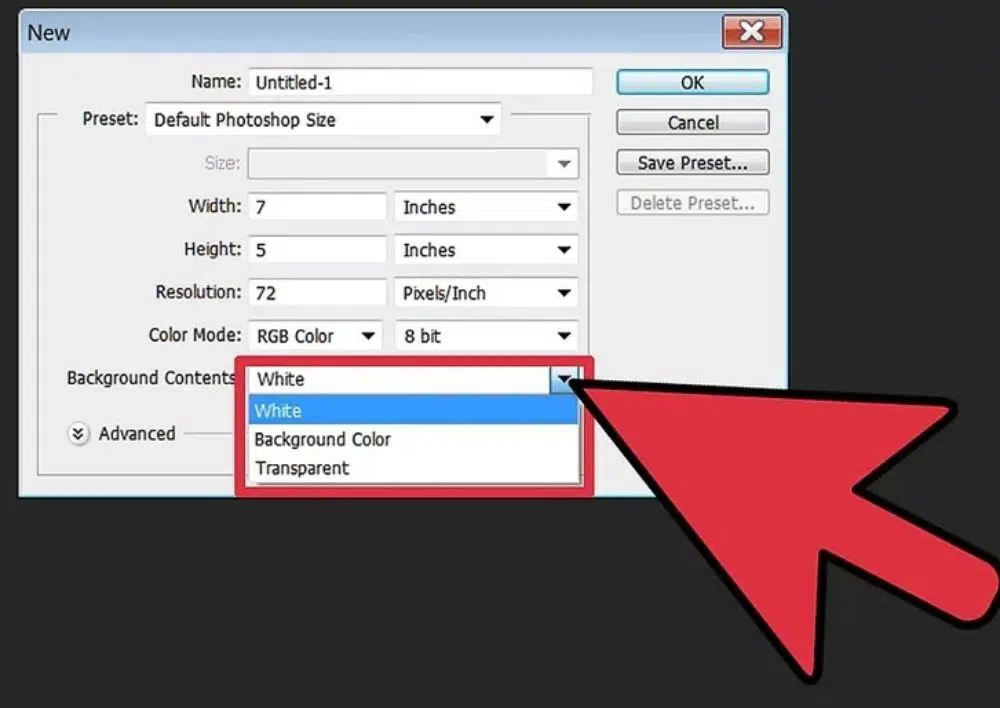
Once you click the “New” option in the File menu in the previous step, it opens the settings dialog box to create a new document; in this case, it would be a background image. In the “Background Contents” field, you get options like White, Background Color and Transparent.
If you select “White” option, it sets the workspace background to white. If you have selected “Background Color”, the workspace takes up the color that you select in the color palette on the left of the workspace. And the background turns transparent if you have selected “Transparent”. The last option is ideal for creating GIF and PNG image formats. You should keep in mind that the transparent pixels are turned to white when you use an image with transparent pixels as your background.
As we are creating the background image to use it as a Zoom background, we select the “Background Color” option from the 3 options available.
3. Adjusting the other configurations of the document:
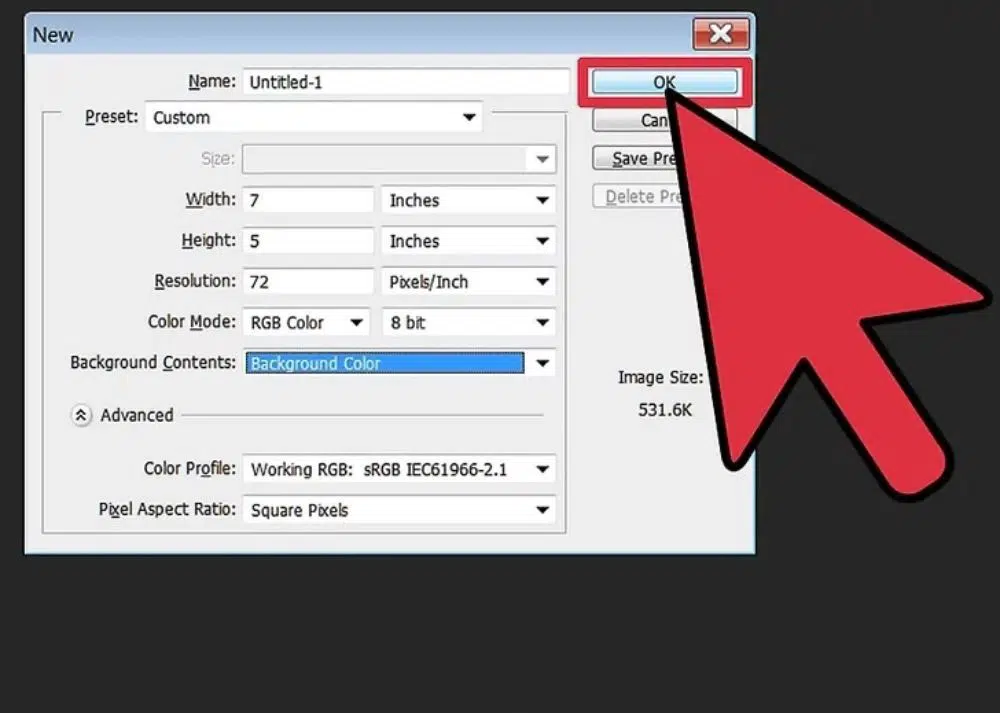
You can also set the resolution and other parameters in the dialog box before you begin to create the background image for future use. You can configure and mention the values for the fields, namely Color Mode and Resolution, to decide what your image appears to be. Now you can start working on the type of background image you have visualized.
Based on the number of color channels in the color model, the Color Mode controls how the components of the color are combined.
Resolution is the number of squares/pixels along the width and the height of the image. As the pixels per certain width and height increases, the resolution of the image increases. With a higher resolution, the image becomes clearer to see with more defined details. But the size of the file increases, as the resolution increases and it takes a significant amount of time to download the file.
Method-2: Creating a background image from an already existing image:
1. Subject selection:
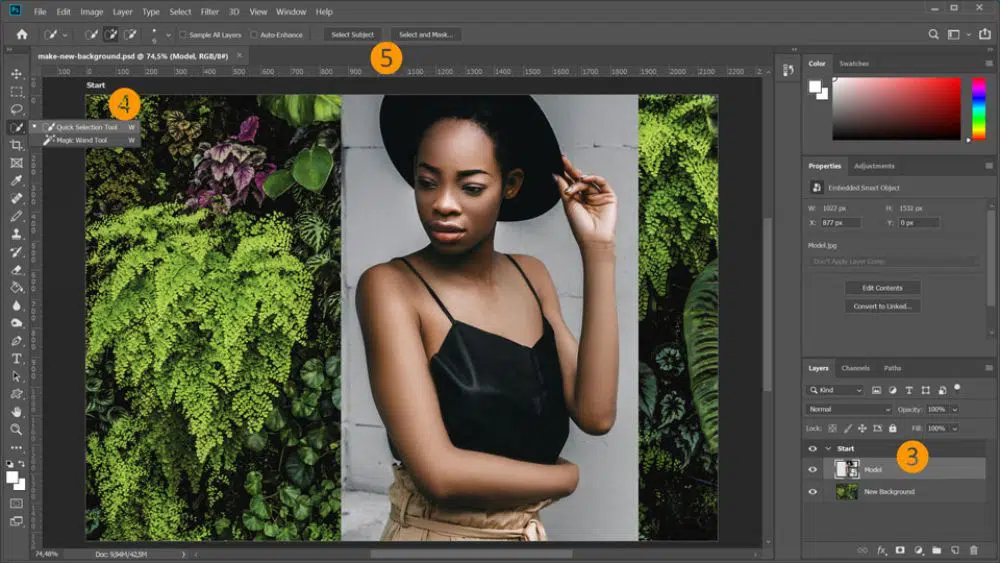
Once you click on the Photoshop to open it, make sure the version copy is the latest. Create and open a new background called make-new-background.psd, a Photoshop file with two layers, a Model and a New Background.
In the Layers panel, click the “Model” layer. Choose the “Quick Select” tool. Click “Select Subject” and then click “Select and Mask”.
Layers in Photoshop are identical to stacked sheet of transparent papers wherein you can see the things beneath each layer. To position the content on the layer, you move the layers around other layers. To change the transparency levels, you can tweak the opacity levels of each layer. The purpose of Layers is to carry out tasks like multiple images composition, putting text on an image, or dealing with vector graphics.
2. Refining the Selection:
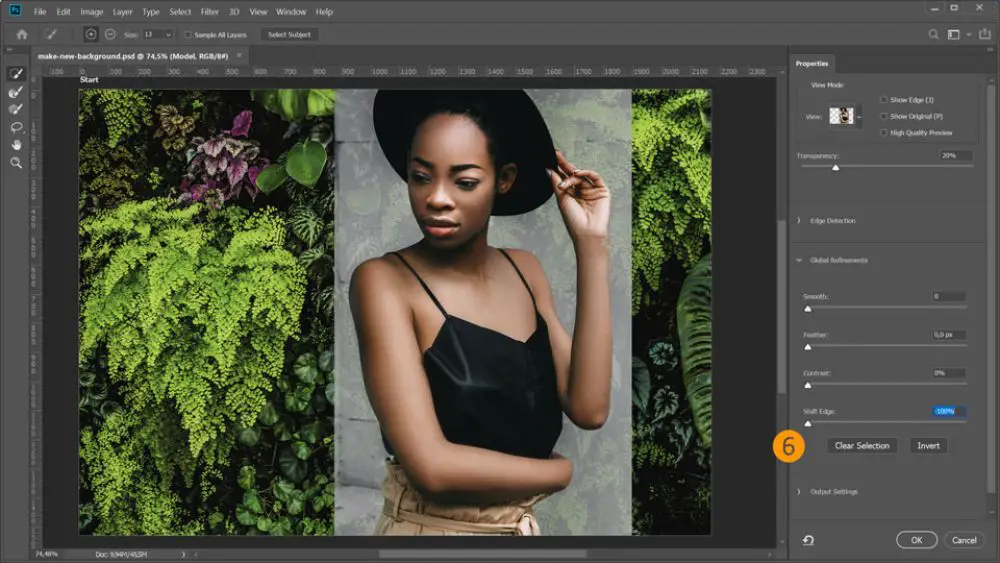
Move the “Shift Edge” slider to the left and click Ok. In the Layers panel, click Add Layer Mask.
Note: The background comes back when you leave Select and Mask mode.
3. Unifying the Colors:
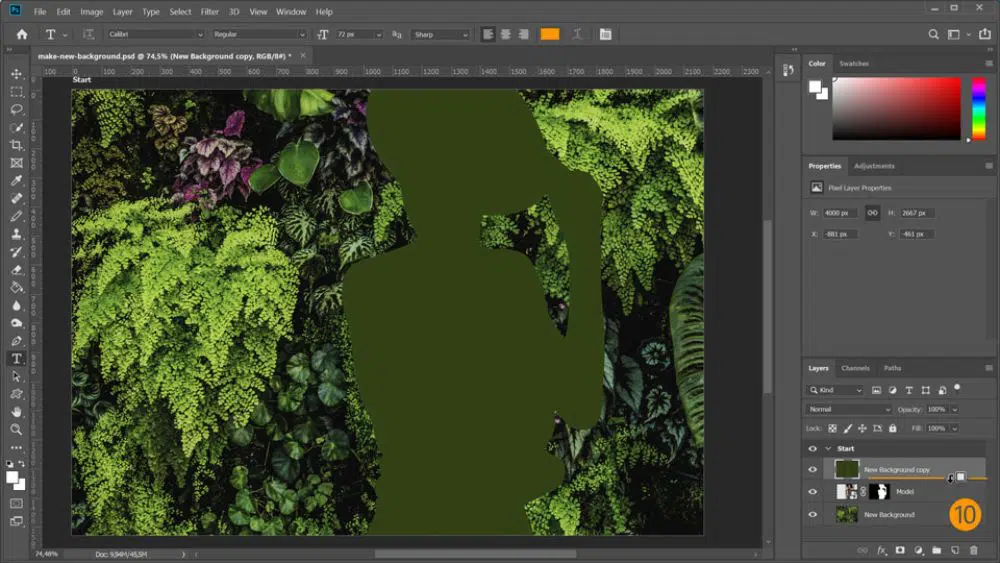
In the Layers panel, press the Alt button while dragging the New Background layer above the Model to duplicate it. Click the “New Background” layer, which you have duplicated. Everything would turn green when you select Filter-Blur-Average.
Click between the green layer and the model layer while you press the Alt key. This creates a clipping mask. The Model is filled with green color. Set the Blend Mode to “Soft Light” while the green layer is selected. You have to reduce the Opacity to 45%.
The Blending Mode defines how pixels of the image behave when you work upon them by painting or and editing tool. The base color is the original color in the picture. The blend color is the color that is you apply with the painting or editing tools. The result color is the color that appears when you finish the blending.
Blending mode has several settings to tweak the image in different ways. Some of the values of the settings are: Clear, Darken, Multiply, Soft Light, Color Burn, and many others.
4. Applying the Color Effects:
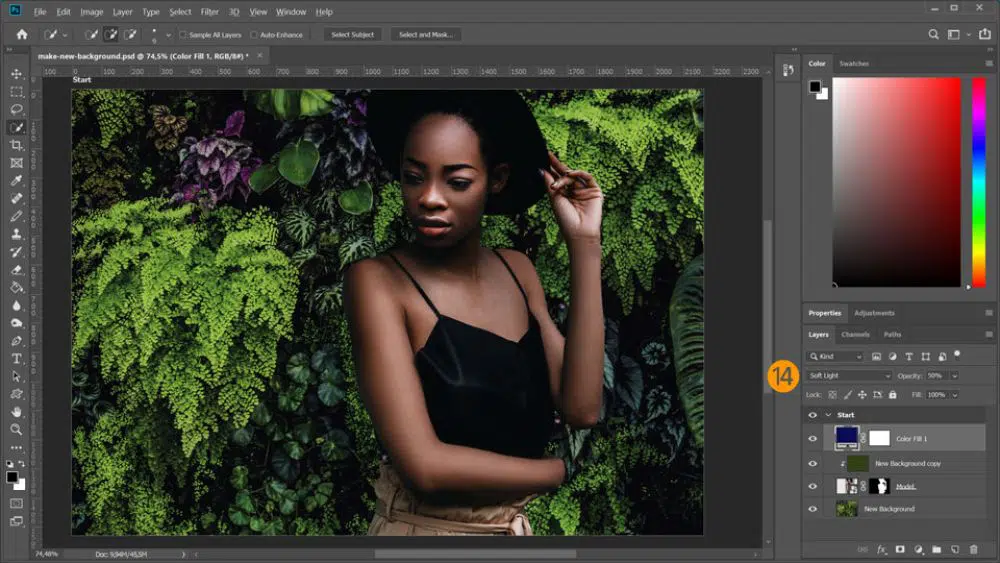
To add the color effects, choose “New adjustment layer” in the Layers panel and then choose “Solid Color”. Select a dark blue shade from the color picker. Set “Blend Mode” to “Soft Light” in the Layers panel. And then Reduce “Opacity” to 50%.
Zoom can have virtual backgrounds where your real background is not visible to the caller(s), thereby hiding your background on purpose. You have to enable the virtual background setting in the Zoom to use this feature.
Zoom Background Specifications:
Before we start using the images that we created in Photoshop, it is necessary to understand that the Zoom virtual backgrounds should be in 16:9 ratios with an ideal resolution of 1920 x 1080 pixels. Black bars appear on the side of the images you use as a background image if the image has a different ratio parameter. And the caller would identify you as a new user.
You can use JPEG, GIF or 24-bit PNG file format images.
1. Finding good images:
The key to having a good background is to find an excellent picture that can qualify as a background picture. You should not use a very distracting picture. And while using the pictures from an external source, make sure you check the copyrights to see the required attribution.
2. Modifying your pictures:
You can edit the pictures with online photo editors available. Some of the top photo editors that are available online are Pixlr, BeFunky, Fotor or Adobe Spark. You can use these applications if you want to edit the image from cloud storage.
You can edit or create the background images for Zoom in Adobe Photoshop, Microsoft PowerPoint, or Google Slides. But one thing should always be kept in mind that whatever image you edit or create, the resulting picture should be 1920 x 1080 pixels and at the least, fits the 16:9 ratio.
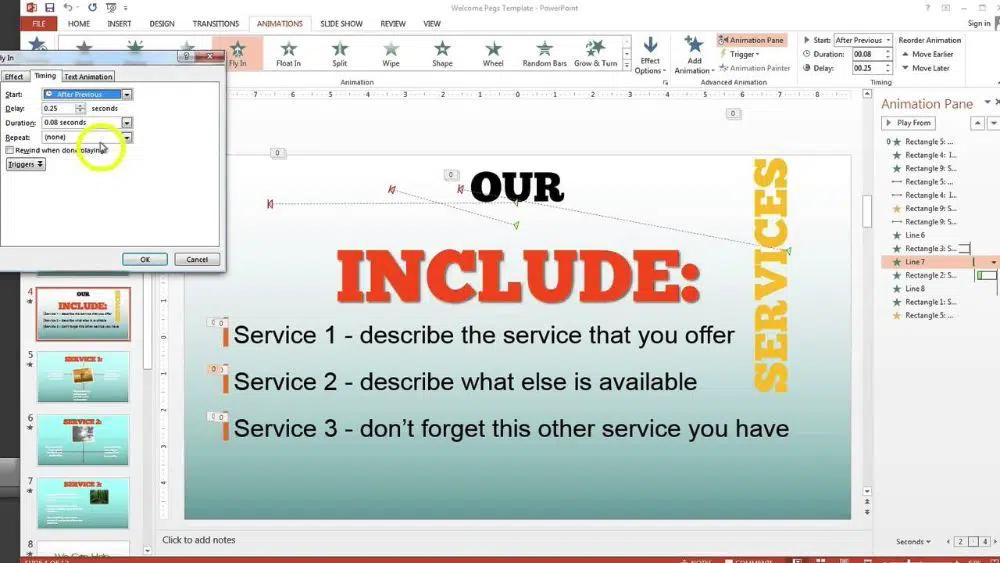
a. Editing Images in PowerPoint:
Great results don’t need high-end applications like Adobe Photoshop and Adobe Illustrator. And it is easy to see that simple tools make the editing process faster by reducing a considerable amount of time.
You can start by using an empty slide in Microsoft PowerPoint without using any other tools on the slide. Now, click on the “Design Menu”, select “Slide Size” and select “Wide Screen (16:9)” in the Slide Size options. It makes sure that the ratio is in accordance with the background for Zoom. Add the photo to the slide and resize the picture that perfectly fits the slide size. If it does not fit the slide in the right ways, consider putting the image to the centre of the slide. Also cosnider adding a border to the image. It fills in the other white gaps around the image.
We put a transparent border on the image. Insert a rectangle. While the rectangle is still selected, and fits the slide perfectly, set the shape fill to transparent. You can do this by going to Shape Format Menu, selecting No Fill in the Shape Fill option. You can see the picture now.
Coordinate your border with the picture by clicking Shape Format and selecting Eye Dropper in the Shape Outline option. You would be able to see a tiny color square which indicates what color it would choose if you clicked the location while you move your eyedropper around. Click at the desired point to choose the color according to your requirements.
To cover the gaps around the picture, you can thicken the borders around it. If you directly add the border to the picture, it highlights the imperfect ratio. Instead, add a border to the transparent rectangle on the top of the picture to get 16:9 ratio. It is also going to hide the imperfections. To do this, select the rectangle and go to Shape Format menu, select Shape Outline, select Weight and select More Lines. All the gaps and imperfections get covered as you increase the width of the border of the rectangle.
Once you follow the above steps, you can save the slide in image format. To do this, go to the File menu, and select Save As. Select the folder you want to save the image. Select PNG file format while saving the slide. Choose this one slide when it asks you whether you want to save each and every one of the slides. This slide now converts to image which you can use as a Zoom background.
b. Editing in Google Slides:
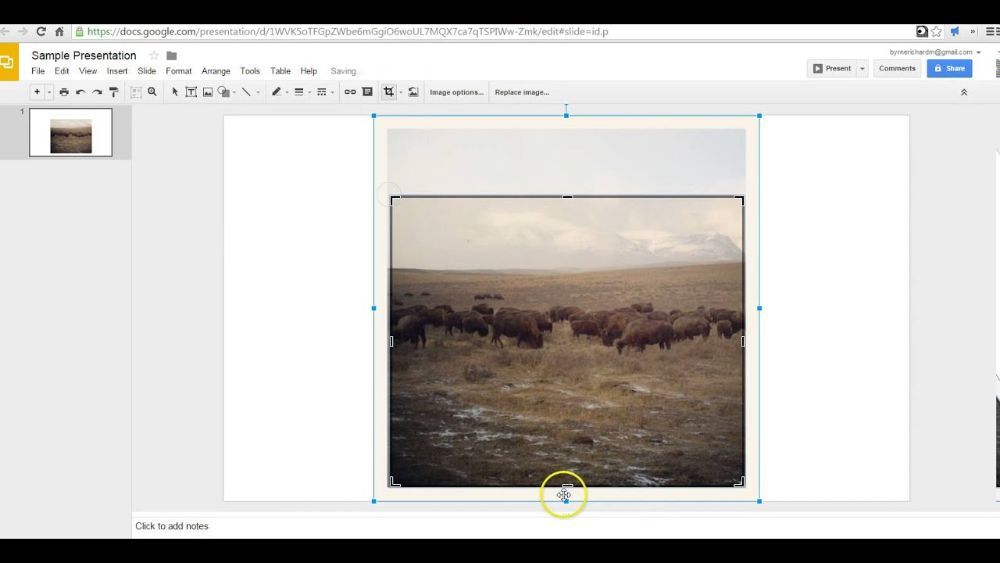
This method is closely related to editing the image in Microsoft PowerPoint. To begin, click Insert Menu and select Image. You have to select the image from whichever source you want to. Once the required photo is selected and added, resize the photo to fill the slide real estate. Resizing can mean enlarging the image or making it smaller.
If you need a logo, you have to locate the logo image and add it to your picture. You should put the logo on the corner at top left position, while leaving a bit of gap between the edge of the photo and the logo.
You should avoid adding the text to the third bottom line or the centre area because you should assume the Zoom shows your name in this third line. And in the centre of the screen, your face appears and having a text there won’t be meaningful. But, you can add your contact details and social media IDs to encourage networking outside the Zoom meetings and conferences.
They may not be visible if there are so many users on one Zoom meeting. So it is advisable to restrict the contact details to a minimum number of words.
Conclusion:
After going through the above-listed steps, it becomes clear that either you created a background image of your own or you have modified an existing image. So now, you can use your result, the next time you have Zoom meetings, conferences or webinars. The key to creating a good background is, to create a background that is neither very overpowering nor very distracting. It does not give out a good impression if you have a background image with very distracting designs.
